Page 1 of 2
Fitting the A R B kit
Posted: Thu Dec 06, 2007 11:51 pm
by stylussprinter
When you fit the bar , fit the bolts from the centre of the engine bay , then the washer/nyloc faces left and right wings. The spacers in the top mounts may need a touch on the grindstone as they were the only closest fit available --- just a 1mm or none in some cases.
Adjust the links so that under braking the 90 degree arms don't touch the chassis triangular tubes ---- push hard down on the inboard rockers to check there is a little space . Tighten the lock nut on the 4 rodends or the thread could strip

Tighten all 4 rod end bolts so that all weight rests only on the rod end eye

Our chassis , I've noticed , can vary slightly in the tube positions so you may need to pack behind the slotted lower poly mounting bracket to get a hole drilled through the tube. 2 or 3 mm will be enough if anything at all . Piece of slotted alloy facing down OR a washer or two if you don't mind removing the bolt

When bolting the clamps tight , slip a little graphite grease around the bar where the clamps grip.(the 'bar' is 16mm--also clamps--but you can leave a 1mm gap until it settles/loosens OR it will become a shock absorber
)
If you find that the bar does touch the chassis under hard breaking , there is enough thread into the links to take a little off each end ok .

Having fitted it , I doubt if any of you will need more camber than 2 degrees and around 1.5 degrees on road only. Once the summer comes you can check better after a spirited drive by checking tyre temperatures OUTER - MIDDLE - INNER If temp's are roughly equal cambers ok. If inner is much hotter then camber's too much ---- if outer is much hotter then camber's too little . Don't forget that tyre pressures will affect this so make sure they're not too high/low ---- 16 to 20 psi depending on weight
LAST adjustment hole i.e. nearest the end of the lever WILL be best setting for most

O.K. Who's 1st then ?
Posted: Sat Dec 29, 2007 12:22 pm
by stylussprinter
Who's going to be the first to get his ARB fitted , car set up , tried/tested with results/comm
ents/photo's then

Posted: Sat Dec 29, 2007 5:20 pm
by kevp
My car is stored around a friends house at mo. New Stylus garage up to plate height as I type. But everyones left for the xmas break so Im kicking around - bored to tears, with not enough enthusiasum to go to work. Kit looks good though Rob & Ive secured a new (2nd) hand gearbox so at least Im thinking Stylus.
Kev
Posted: Sat Dec 29, 2007 6:32 pm
by Pete&Matt
well we have ours, but its still in the bubble wrap and plonked in the footwell of the car lol! We will fit it when we do the shocks, do it all in one go then!
Looks to be a very nice little kit though
ARB Fitting update
Posted: Sun Jan 06, 2008 11:45 pm
by MattD
Hi All
Had a go at fitting my ARB today. Came across a few teething problems, nothing that can't be sorted.
Firstly... The bottom bracket slot length was slightly too long. Might just be my chassis, but look out for it on yours.
I had to cut 1/8th inch off to clear the body of the shock unit when lent over 45 degrees into the operating position (OK when vertical).
Had metal to metal contact beforehand, particualrly not good of you have Ali units.
Don't forget to paint the cut edges, as the zinc finish has been compromised (they'll rust).


Secondly.... The top bracket needs to be used with cap head bolts. You can't get a socket or spanner on hexagon head bolts.
(like my original SSC one's in the pics).
Third.... On the folded type rocking arms the top bracket interferes with the welds on the arm & won't sit flat.
If you look closely at Rob's brackets, one side has a slight curve. This curve clears the weld, so effectively they're handed.
Fit them the right way round.
(I think the base & one side was folded / cut from angle, with the other side welded on)


Finally... And I'm just unlucky with how its fitted.... My bottom radiator hose runs exaclty where the ARB wants to sit. I'm gonna have to cut/reroute my gold-plated raceline/samco radiator hose. If I'm lucky I can run it the other side of the rocker upright, If not I'll have to rethink the whole thing.
If you're in build, you can avoid this by thinking up an alternative route.


Just goes to prove every car is unique !!
Cheers
Matt
Re: ARB Fitting update
Posted: Mon Jan 07, 2008 12:56 am
by stylussprinter
Now fitted, but not yet tested
Posted: Tue Jan 22, 2008 6:50 pm
by MattD
Hi All
I've now got Rob's ARB fitted to my car, complete with spacers to raise it above the radiator bottom hose.
After the initial teething problems, getting the right bolts & making the spacers, the fit was pretty straightforward.
We'll see if I notice the difference on the way to MOT on Saturday.
Cheers
Matt


Re: Fitting the A R B kit
Posted: Wed Feb 25, 2009 12:12 pm
by stylussprinter
The top shock bolt mounting for the ARB ' U ' bracket shouldn't foul on any welded rocker seams now because all ' U ' brackets are much smaller & lighter now . See the ones on my car --- in CHASSIS SUSPENSION section --- Repairs Topic.
Matt's post is good for seeing how much space is required for the lever arms to rise & fall if you have an engine sitting more forward than Matt's or mine.
The ARB itself is 400mm wide and the lever arms extend away from the ARB 100mm. If there are special problems due to a specific engine location then the dimensions can be changed --- length of ARB & length of levers. There are limits though or the bar will be too stiff
ie. I could make one just 200mm wide with 80mm levers but the quality of material for the ' bar ' itself would have to be much higher spec' , necessitating greater volume buying of material , and would still make the ARB a more expensive kit
------ don't want to do that

Re: Fitting the A R B kit
Posted: Sun Jan 30, 2011 11:59 pm
by pigeondave
Hi,
I have finally got round to fitting the ARB and have run into a problem. The water pump pully gets in the way. Its close but doesnt quite touch. How much movement does the drop link go through.
Anyone got any ideas?
Front ish view
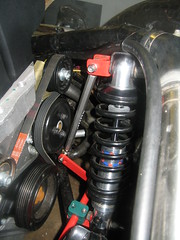 Fury ARB 1
 by
pigeondave, on Flickr
Side View
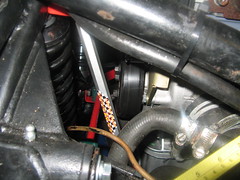 Fury ARB 2
 by
pigeondave, on Flickr
Engine on right is the zetec blacktop installed. Note the water pump pully.
 Engine Head on
 by
pigeondave, on Flickr
Which side of the ARB are the drop links supposed to go inside or out? If they go inside i think that they'll touch the pully.
Other than this problem fitting the ARB kit was easy. I did take the top rockers and shocks out to make access a little easier. But they had to come out anyway as I had to ease the top rockers for the different profile if the new Pro-tech shocks.
Re: Fitting the A R B kit
Posted: Mon Jan 31, 2011 12:34 pm
by stylussprinter
Dave , does the photo show the car with weight on or is it jacked up
The shock appears to have massive travel if weighted on the floor . I normally fit the links on the inside of the ARB to keep the rodends at a shallow angle. Also , what is the measurement under the lever arm end TO the chassis tube
Perhaps you've allowed too much space under the lever arm . If you have 250 to 300lbs springs up front the travel will only be 25 to 40mm,s so the space under the lever arm end can be just a touch over that . If it touches then shorten them . The rodends can be extended to half their threaded length each end of the links . One thing I find very odd is how close the water pump pulley is to the links ----- mine are inches away although mine is a Silvertop . Maybe your engine is mounted even further to the passenger side than most Jeremy Phillips designs . This has never mean mentioned to me before so I'm a little baffled .
Re: Fitting the A R B kit
Posted: Mon Jan 31, 2011 1:02 pm
by pigeondave
Rob,
Fair point the car is still jacked up. So the suspension is in full drop. The springs are 180lbs on the front 130's on the back. If you look at my last pic you can see the difference in location of the water pump pulley between silver top (1800cc) and black top(2000cc). My chassis is an old one i think as there is a welded plate down the side of the chassis. All the other chassis i have seen, when you take the side pod off to get to the exhaust, you can see the diagonal cross bracing. I have no diagonal just a welded plate for the full length.
I'll drop it onto the ground tonight and adjust the ARB so that it's 45mm above the chassis and have a jump on it (finally being 18stone +a bit has its uses).
How tight should I do the suspension mounts to once on the ground 65ft-lbs?
Re: Fitting the A R B kit
Posted: Mon Jan 31, 2011 2:13 pm
by stylussprinter
By suspension did you mean the ARB link rodends
if yes , then tight as you can because the rodend ' bearing' must be the pivot NOT the bolt . I've never measured the torque but using a 7 inch spanner plus make sure the thread gets into the nyloc will do it . Those guys who've had the links drop out and lost bits number only 3 , all were due to under tightening so put your arms to work Dave

I'm surprised you are using that spring set though , they might be just about ok for a bec Fury but not a Black Topped car . On road I wouldn't use less than 225 up front and 180 minimum at the rear even if the driver is 12 to 13 stone . Dean's a large chap and after much discussion and trials he ended up with 250 's all round plus my ARB
As long as there's still piston travel in the shock once driver is in situ' it won't feel hard .
Re: Fitting the A R B kit
Posted: Mon Jan 31, 2011 3:06 pm
by pigeondave
Rob,
I remember you saying that the drop links need to be done up tight. I was asking about the bolts that go through the dampers.
I'm haven't yet had a play with spring rates. I don't know what the old ones were/are but Mike B commented on how road friendly the set up was. I assumed that they were as standard from the factory, so thats what i ordered when i got the pro-techs. I know that the forums were saying about 225 front and 180 rear a while ago, so might try that later in the summer.
This summer the car will be more of a tourer with a trip to France planned.
when i find the time to have a fiddle with the spring rates i will probably try the spring spreadsheet found on here
http://www.mymojo.co.uk/index.htm
modifications tab (at the top of the page)> suspension>springs (on the side of the page)
although having the ARB will complicate thing a bit.
Re: Fitting the A R B kit
Posted: Mon Jan 31, 2011 4:03 pm
by stylussprinter
Ok . Then the suspension bolts MUST be pulled up just as tight so that , with washers if required , the inner metal sleeve or the spherical bearing if not poly bushed ---- is gripped very tight ----- for precisely the same reasons as the ARB rodends. If you're 18 st then those spring rates will cause damage eventually . As a road car , if Mike drove without a passenger , he would find it comfortable because his 11st wouldn't make the rear shocks run out of travel on 130's . With your weight I'd be astounded if the rears didn't run out of travel on occasions (bumps or cornering at speed) If the car is live axled simply remove the rear wheel and put a straight edge under the trailing arm ---- it may not be dead straight ie shock runs out at times. If it's independant then tipex the piston rod of the shock vertically ----- check after a quick blast for it being marked right to the bottom/shock body.
Re: Fitting the A R B kit
Posted: Tue Feb 01, 2011 12:24 am
by pigeondave
As always nothing is simple.
When Mike drove the car we were 2 up.
I have dropped the car back onto the ground and its soft. VERY SOFT.
It looks as though it wasn't factory standard with 180F and 130R.

going to whip off the springs off the old shocks and find out what they are.
The front wheels now fill the arches more that they did before. But that could be a spring platform height issue. I havent bothered doing the rears untill I know what springs are in there.
Im guessing that this is where the fun of kit cars starts, the fine tuning.
I haven't been able to drive it as its got no steering column so cant comment on the ride.
Yep the car is live axle and the bottom arms are straight, probably due to the springs being a lot higher rated than I first thought.
I suppose i could put the old springs back on but they look a bit tatty and the dampers are new. I got to spend my money on something