Page 10 of 11
Re: RT rebuild thread
Posted: Thu Apr 04, 2013 2:02 pm
by stylussprinter
DH2 wrote:stylussprinter wrote:It's getting there , so once the wishbones are made up and fitted , you'll romp away Dave

Sounds simple doesn't it? I frequently despair at the amount still to do... just got to try not to think about it, and keep chipping away at it.
Dave
I had imaginary plans to build my Stylus within 6mths and at the time , couldn't see why it could possibly take any longer --- however , it took me 2 yrs and double my planned budget

I'm convinced I could do it now though , after 12 yrs of mod's etc

Re: RT rebuild thread
Posted: Thu Apr 04, 2013 3:02 pm
by josephmoore
stylussprinter wrote:however , it took me 2 yrs and double my planned budget
I think this is why I have absolutely no regrets in taking the easy way in and buying one second hand... though I'm sure there's enjoyment, and a certainly intimacy with knowing what's what on the car which I don't have.
Re: RT rebuild thread
Posted: Fri May 31, 2013 12:28 pm
by DH2
There doesn't seem to be much going into these updates, yet I'm sure I spend every weekend and more in the garage!
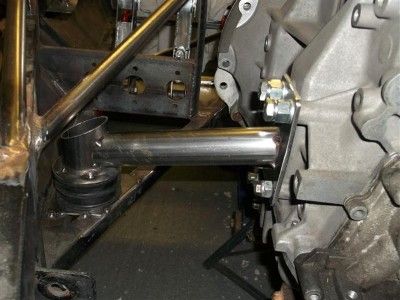
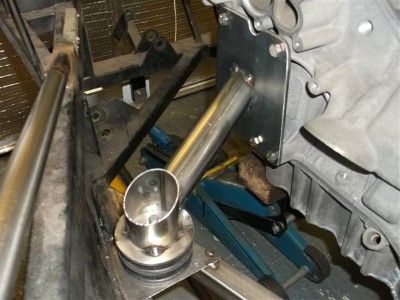
Continuing from last time, next step on the new rear suspension was fabricating the diff mount - I can't tack it all into place, due to required welding sequence, but I was able to final locate the diff and hang it in the chassis (temporarily).
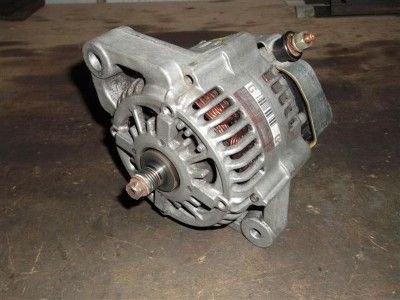
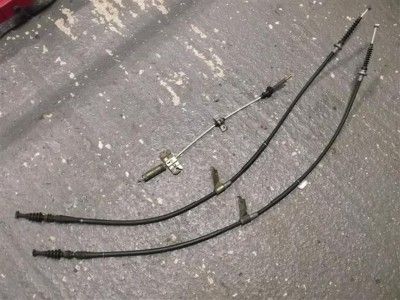
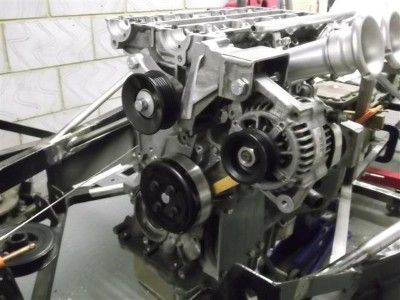
Procured some cheap parts for mocking up with. A lightweight alternator so I can work on the engine mounts (when I eventually get my block back), and handbrake cables to see if I can make a route for them, and a location for the lever.
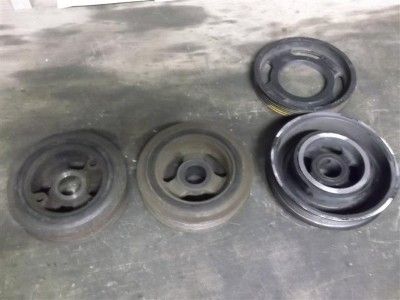
Pick a crank pulley, any crank pulley...
Last weekend I finally got round to sorting out a throttle pedal mount. I had thought I was going to have to top mount it, but managed to invent a way to squeeze it in at the bottom. This is a step towards getting the steering column mounted, as I can now work on the top part of the driver footwell without having to make provision for the pedal. Everything is on the critical path for everything else!
Last week also got a bit unexpectedly spendy. A couple more items turned up at good prices, a BGH E6 and set of CXRs!
Dave
Re: RT rebuild thread
Posted: Fri May 31, 2013 12:36 pm
by stylussprinter
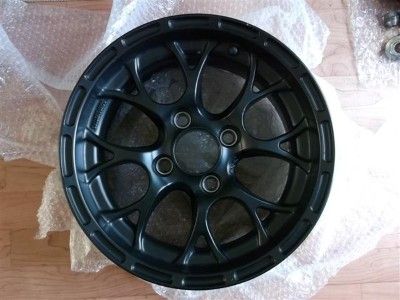
It's coming Dave . I'd like those CXR Compomotives too , a nice light wheel if I could find secondhand ones the right size and off-set. What did you buy size wise and cost etc

My ML's weigh 8.5 kgs
Re: RT rebuild thread
Posted: Fri May 31, 2013 1:14 pm
by DH2
stylussprinter wrote:It's coming Dave . I'd like those CXR Compomotives too , a nice light wheel if I could find secondhand ones the right size and off-set. What did you buy size wise and cost etc
My ML's weigh 8.5 kgs
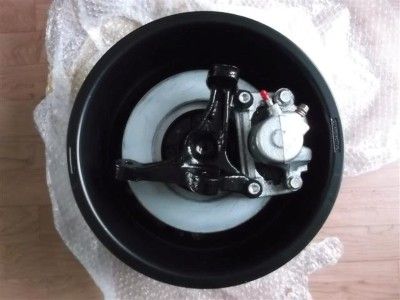
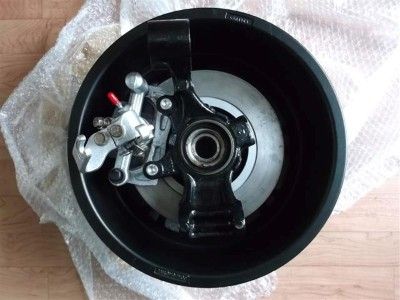
CXR wasn't my first choice, but they came up secondhand, and just happened to be in the correct PCD for me (MX-5 is 100mm PCD, rather than the Ford 108mm). I've not put one on a scale yet, but I believe they weigh approx 4kgs. Rim is 13" 6.5J ET16, with the intention of tyres in the 185-205 range. Offset doesn't matter too much to me at this point in the build, since all suspension is scratch, and has designed-in adjustable track at the rear anyway. Hubs/uprights/brakes fit inside with plenty of clearance, which is a plus point with the CXR. I paid 350 for them, they are not brand new, but have only had tyres fitted then removed, never been run on a car.
Dave
Re: RT rebuild thread
Posted: Fri May 31, 2013 2:43 pm
by CMA
Looking good Dave.
What is the alternator off? A nissan micra? Might have to look one up if I can't get the standard Zetec one to work for me.
Re: RT rebuild thread
Posted: Fri May 31, 2013 3:16 pm
by DH2
CMA wrote:What is the alternator off? A nissan micra? Might have to look one up if I can't get the standard Zetec one to work for me.
It is from a Daihatsu Cuore/Sirion/Move 1.0. This a 60amp unit, which I went for in case I go with a heated screen - without that you'd probably be ok with the even smaller 45amp one, which I think you will find from the 850cc engined Daihatsu models. They are pretty compact and light weight - also easy mounting points, so pretty flexible in that respect.
Dave
Re: RT rebuild thread
Posted: Fri Oct 18, 2013 2:03 pm
by MattD
How are you getting on Dave ??
Just noticed the alternator - same as I've used on mine, replacing a big heavy marelli jobbie.
Re: RT rebuild thread
Posted: Sat Oct 19, 2013 11:45 am
by DH2
MattD wrote:How are you getting on Dave ??
Annoyingly slowly. Been really busy with work, so not had slot of time on the car. But I've been meaning to post an update so will do that over the weekend.
Dave
Re: RT rebuild thread
Posted: Sun Oct 20, 2013 9:55 pm
by DH2
Update time.
There's been a fair amount of two steps forward, two steps back. And waiting for parts or things to be done. Or stuck at work rather than in the garage...
I had been working on a Sierra column, but switched to an MX5 column as it's a better fit. A bonus is that the stalks I have are an almost direct fit.

Found an alignment problem with my pedal box, so had to cut it out again, and reproduce it.
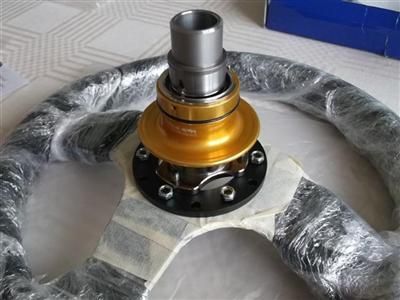
So I can work out where the steering column needs to go, I had to buy my steering wheel, and bling quick-release coupling.
After lots of mocking up and testing, I made up the first pair of seat mounts. These put the base of the seat an inch below the floor of the chassis.
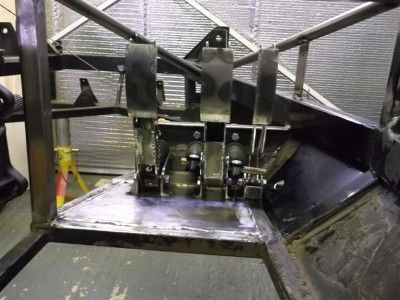
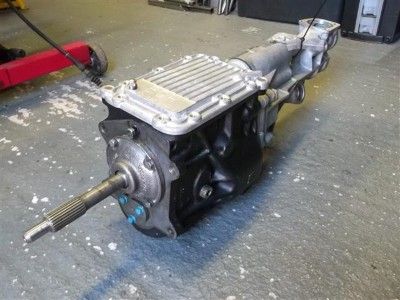
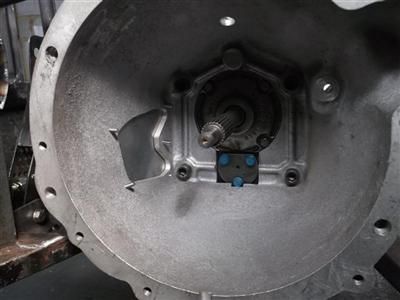
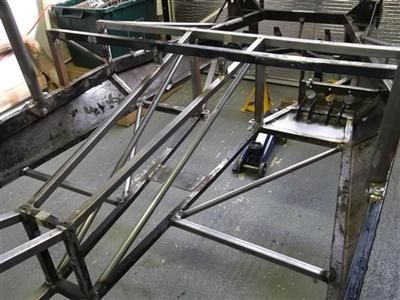
Made some modifications to the bellhousing to clear the extra bearing cover on the front of the gearbox, and a closing panel for the hole in the side.
A couple of bits of small fabrication - handbrake lever modified to fit in the tunnel and bracket made to support it. Also a removeable brace to close the bottom of the front end of the tunnel.

Finished off making up the framework for closing off the end of the drivers footwell - this will have a removeable panel on top.

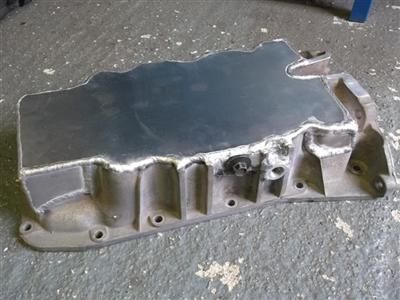
Managed to get a day off to take the chassis up to my friendly fabricator. Got all the new rear end fully welded in, some other bits of chassis bracing I had prepared, and also got my shortened sump back from him.
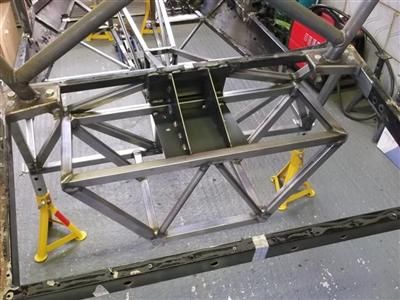
Now that the new seat pans and rear suspension frame is all welded in, I could remove the old rear boot / forward arm support frame - bob-tailed!
Finally got the pedal box a bit nearer to being finished by making a throttle pedal and mount.

That's fairly up-to-date. I'm a bit blocked in some areas, that I need to have a bit of a push to get sorted, but there's still things I can work on. I'm back onto engine mounts at the moment, now that the diff is in final position.
Dave
Re: RT rebuild thread
Posted: Fri Jan 10, 2014 2:01 pm
by DH2
Whilst things continue to be a bit slow on getting people to do things for me, I'm slowly progressing - any progress is better than no progress!
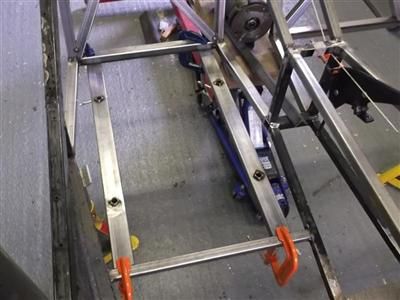
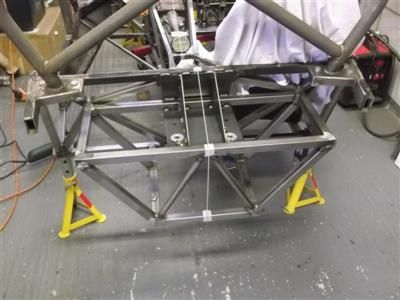
I made a removable brace that closes the lower rear tunnel, and doubles up as a lower diff mount. This will have some rubber inserts for NVH purposes.
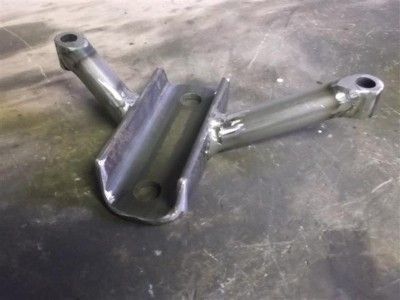
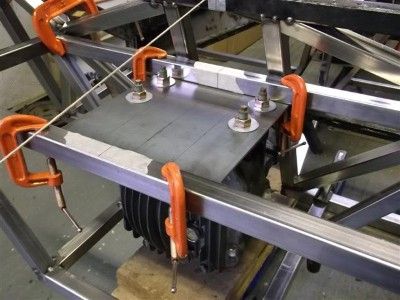
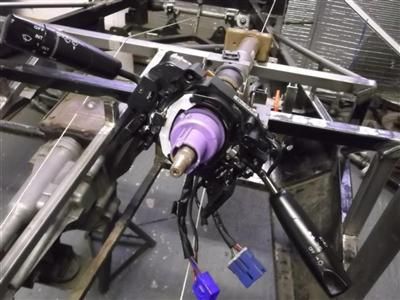
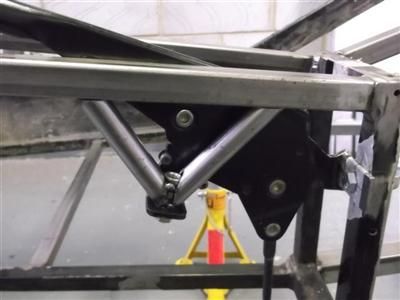
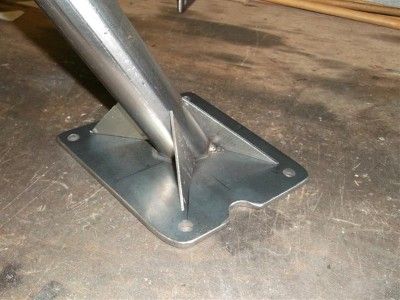
I then needed to finally face up to doing engine mounts. As such I bought a propshaft, so that I could get the alignment as good as possible. Then I spent a while measuring, staring and shuffling the engine and gearbox into a position that I think (hope) will work. I set about the engine mounts, starting by undoing some of the work I did on this a while ago, and getting some plates cut for the engine. This showed that I needed to do a few other things too - so I emptied my pockets at Ford buying all the remaining parts to build up the engine, and had to pause engine mounts to make an alternator mount. It's a bit agricultural, but will do for a mk1.
Some time later, I finally got to the point of finalising the engine mounts. I just need to add gussets, but the engine didn't move when I dropped the jack out from under it, or when I stood on the block.
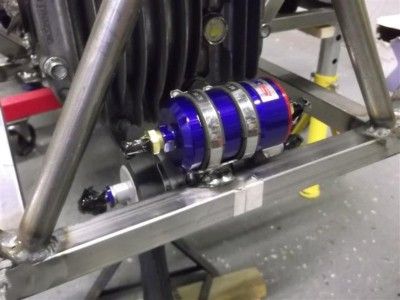
Whilst I'm a bit stalled still on some of the fundamental stuff, I distracted myself by thinking about what other little brackets and bits need attaching to the chassis before it gets coated. So I made a mounting arrangement for the fuel pump and filter, sitting in the space behind the diff. Also attached some tabs for these neat clips I got for fuel and brake pipes in the tunnel.

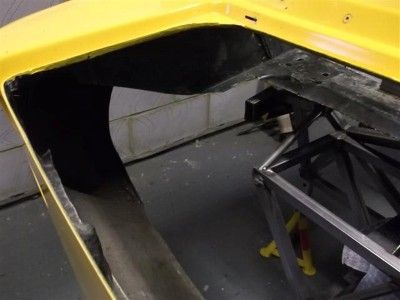
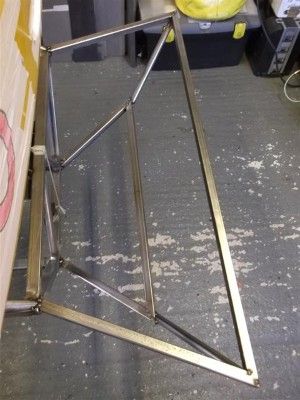
Another thing I can do in the fabrication world, is to make up the framework at the back of the chassis, to hold the fuel tank and support the bodywork and boot. So I got the main body tub back onto the chassis, and chopped out the nasty old boot so I can see what I am doing. I'll make a frame to fit inside here, and size and shape up the fuel tank to suit.
Things are still moving on the other fabrication bits, but I'm reliant on other people, who for various reasons are going a bit slower than I would like.
Dave
Re: RT rebuild thread
Posted: Fri Jan 10, 2014 4:31 pm
by stylussprinter
Looks good Dave . My own experience with engine mounts has shown me that regardless of looks , they definitely need gussets , especially the passenger side even if it doesn't appear to move. I had both fracture many years back on the factory parts so simply repaired them and added two triangular gussets with the base being the same measurement as the main mounts were wide.
Re: RT rebuild thread
Posted: Wed Mar 12, 2014 11:19 am
by DH2
Small update.
Made some gussets for the engine mounts, which can be added once the mounts are properly welded, by a proper welder.
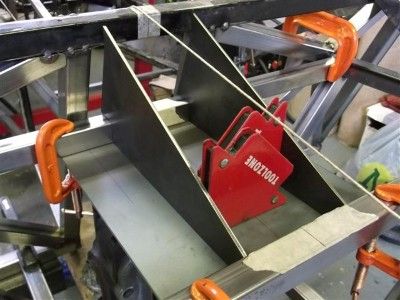
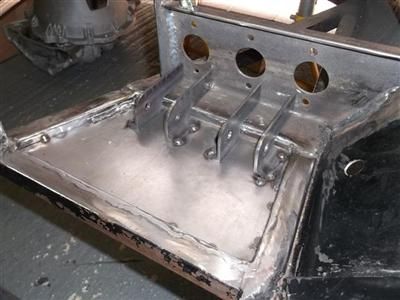
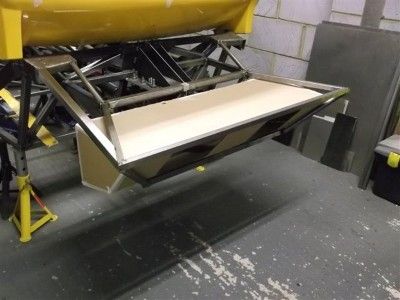
Then I started on making up a frame for the rear of the car, to support the fuel tank and boot. First up, I made this out of some scrap that came out of the rest of the car somewhere, and made a "composite" fuel tank for experimenting with.
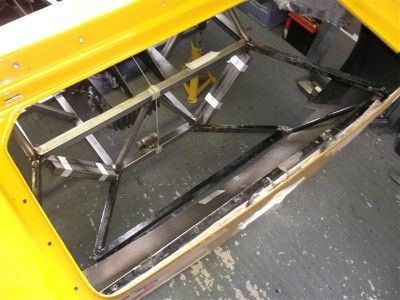
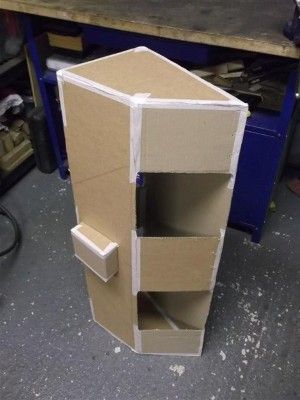
With that looking like it is going to work, I went ahead and remade it out of shiny new metal. This gives me about 32 litres capacity, and the tank can just be squeezed in and out thorough the boot for maintenance (without having to take the body off).
In other news, the project is sadly going to be sidelined for a while. I'm making a career change, which also involves relocation. I'll be retaining my current garage, but living 70 miles away without a garage, so won't be able to progess things very much. Hopefully it won't be too long before I get a new place with a garage, and can get it moved back to me. It's not really ideal, but I will be playing with cars for a job now...
Dave
Re: RT rebuild thread
Posted: Wed Mar 12, 2014 12:17 pm
by stylussprinter
Playing with cars sounds a nice move
It all looks tidy anyway . I wouldn't worry about the alternator bracket looking agricultrural , mine sits on an ally bottom bracket but the top adjuster I've made from 3mm carbon fibre and all is well for two years now

Re: RT rebuild thread
Posted: Wed Mar 12, 2014 8:03 pm
by Craig-Chap
Off anywhere interesting Dave?