My build progress & a million questions

Here you can discuss/show your (re)build progress and (would be) mods.
Post Reply
User avatar
Werner Van Loock
Stylus owner
Posts: 531
Joined: Tue Feb 28, 2006 3:37 pm
Are you a Stylus owner?: yes
Location: Antwerp, BE
Contact:

My build progress & a million questions

Post by Werner Van Loock »

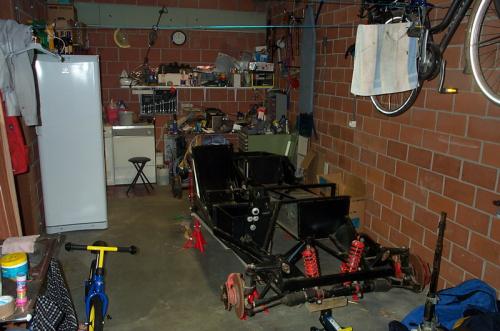
The car is finally ion the garage so the real stuff can start.

Image

Started dismantling it and already found a few gremlins :shock:

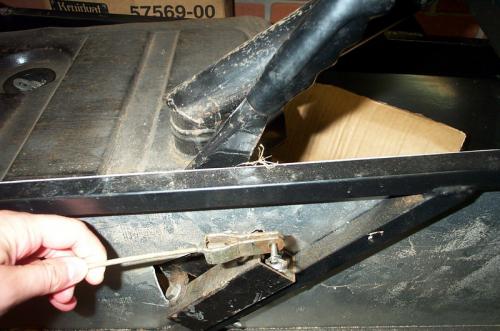
1: Handbrake cable doesn't line up with lever, is the lever in the wrong place or is the cable too long? Also the lever is on the outside of the panel. How do I get the cable there?
Image

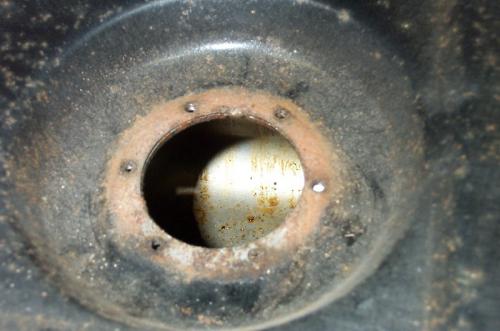
2: Fuel tank is supposed to be midget and I have a midget fuel sender, though the sender has a locking ring and the tank has 6 holes? Wich one is wrong?
Image

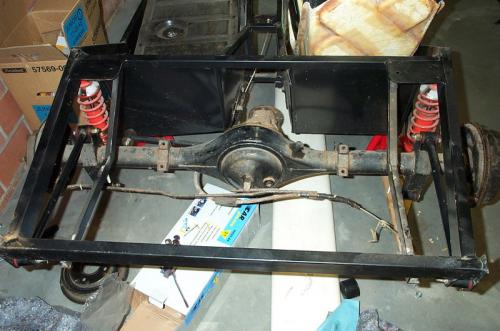
3: Rear axle needs a brush up. Nothing wrong there.
Image

4: One of the drums is missing a plastic abutment pin (or somehting like that), is that a problem? SVA/MOT/operation wise?
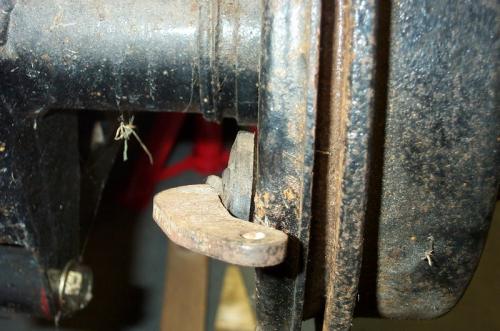
Image

5: The hand brake thingy is missing a bush on the back of the axle? Where do I get one and is it needed? SVA/MOT/operation wise?

Image

6: This can't be the right way to tighten the shock is it? Guess I should shim it up?
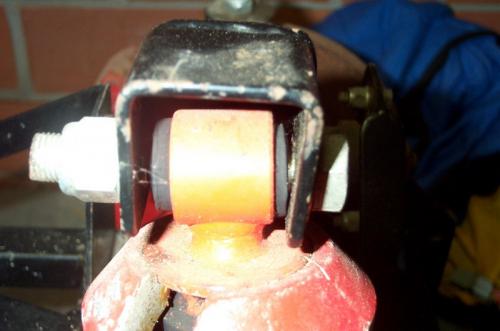
Image

7: This one really pisses me off. Why put something together with worn/torn/broken parts? This won't pass a MOT does it?
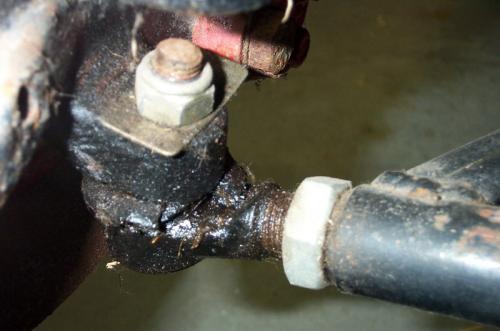
Image

I told you it was a million of questions.

Still have more though without pictures.

8: The front axles don't spin at all, I have to use force to get em rotating, needs new bearings I guess or is always this heavy? No wheel, no brakes/pads in place.

9: Where does the throttle pedal attach to? Can't seem to find anything where the horizontal bar fits.

More will follow, I'm sure :P
Last edited by Werner Van Loock on Sun Dec 30, 2007 10:56 am, edited 1 time in total.
User avatar
MattD
Stylus owner
Posts: 693
Joined: Wed Mar 01, 2006 11:48 am
Are you a Stylus owner?: yes
Location: Liphook, Hampshire, UK

Some answers

Post by MattD »

It was a long time ago for me but, if I remeber correctly...

Handbrake lever goes on the inside as you've mounted it, cable comes inside the passenger side (RHD) thru a slot in the rear bulkhead corner.
I had to make a nylon pivot for the cable as it turn 90' upwards, as we all did. The seat then hides the whole lot.

Image

I've got the old type pedals, so yours are different.
Rob has recent experience of floor mounted throttle pedal fitment ! :lol:

Fuel tank is midget, with the six mounting screws, sound like you're sender is wrong.

You'll need to sort the axle bits to make the MOT man happy, but not critical I think. The SVA guy will look harder for problems like that.
My front shox / rocker mounts have also done that, seems to operate OK, but could benefit from some proper spacers.

Sounds like the wheel bearings are too tight, take the split pin out & back the nut off a bit & recheck it.
Should be tight but able to turn by hand, with no slop in it, with no wheel on.

Bottom ball joint (sherpa track rod end) is a weak point, the gaiter tends to split like yours. I've swapped them several times.
This was one of the reasons why the ends of the later arms were cranked upwards to improve the joint angle & reduce pressure on the rubber gaiter.

Correct me if I'm wrong somebody :wink:

Matt
User avatar
Werner Van Loock
Stylus owner
Posts: 531
Joined: Tue Feb 28, 2006 3:37 pm
Are you a Stylus owner?: yes
Location: Antwerp, BE
Contact:

Post by Werner Van Loock »

Thanks already, few questions solved then. Didn't notice the hole under the handbrake lever, but found it :D

Regarding pedals, I guess I have the old ones as it's a '97 kit. I already found where and how it fits, BUT Is it normal that the pedal is more then 5cm forward(towards driver) compared to the others? And also the blue plastic plugs have a lot of play.

Here are a few pictures of what I mean.
Throttle pedal in rest, as you can see the pedal itself isn't positioned correctly.
Image

Here you see the pedal being square to the floor, but then it is 5cm in front of the others. Is this right?

Image

And here's a top view where you see the blue plugs that have a huge amount of play in the pedal box.

Image

I was thinking of making 2 new holes in the pedal box, but behind the brake/clutch pedal bar. Would this work?
User avatar
MattD
Stylus owner
Posts: 693
Joined: Wed Mar 01, 2006 11:48 am
Are you a Stylus owner?: yes
Location: Liphook, Hampshire, UK

Pedals

Post by MattD »

Ah, yours are the same as mine. Mines a '99 chassis.

Pedals are all about personal preference, In you're case I'd just heat up the throttle pedal rod & bend it to how you want it.
Some people want them close together for heel & toe, some want them further apart; some have big boots, some don't.

I changed mine & re welded it several times. A lot better than trying to redrill the holes.
The original escort bushes (like yours) have lots of play in them. Don't think you'll notice in use. Don't worry about it !

I've only just got my clutch pedal how I want it, changed it for the trackday, only took 8 years !

These are the things I noticed & worried about AFTER it was on the road.

Matt
User avatar
Cerberus
Stylus owner
Posts: 460
Joined: Tue Aug 29, 2006 9:47 pm
Location: Bristol

Throttle

Post by Cerberus »

Werner, as mine is in bits i have had a look and mine has an adjustable screw see photos
Image

Image

Its just a L shaped bit of steel with a nut & bolt.

And my bushes on the throttle have loads of play, i wouldn't worry about it.

Hope this helps


Phil
:D
Must try harder
User avatar
Werner Van Loock
Stylus owner
Posts: 531
Joined: Tue Feb 28, 2006 3:37 pm
Are you a Stylus owner?: yes
Location: Antwerp, BE
Contact:

Post by Werner Van Loock »

Thanks, that's a good idea
User avatar
Cerberus
Stylus owner
Posts: 460
Joined: Tue Aug 29, 2006 9:47 pm
Location: Bristol

Photos

Post by Cerberus »

Werner, as i'm slowly ripping my car apart i am quite happy to take pictures for you of different sections if you like, it might give you some ideas :shock:

Phil
:D
Must try harder
User avatar
Werner Van Loock
Stylus owner
Posts: 531
Joined: Tue Feb 28, 2006 3:37 pm
Are you a Stylus owner?: yes
Location: Antwerp, BE
Contact:

Post by Werner Van Loock »

Thanks for the offer. I'm currently looking at the braking and fuel lines, if you could take some pictures of that. Where they run and how they're mounted, specially the rear end is a bit of a puzzle to me.
User avatar
Bikenuts
Stylus owner
Posts: 131
Joined: Tue Mar 28, 2006 2:16 pm
Are you a Stylus owner?: yes
Location: Weardale England

Post by Bikenuts »

Werner,
The part number for the fuel sender is BHA4711 it's for an early(ish) Midget. Moss MG or others should be able to supply one for about £20.

Matt
Pete&Matt
Stylus owner
Posts: 617
Joined: Thu Mar 09, 2006 4:08 pm

Post by Pete&Matt »

i would hold fire on the fuel sender untill you know what gauges you are going to be using! some gauges use one type of measurment and others use a different type. Match the sender to the gauge otherwise it might not work!
stylussprinter
Stylus owner
Posts: 3772
Joined: Fri Mar 10, 2006 8:49 pm
Are you a Stylus owner?: yes
Location: ASTON CLINTON BUCKS

Post by stylussprinter »

Pete&Matt wrote:i would hold fire on the fuel sender untill you know what gauges you are going to be using! some gauges use one type of measurment and others use a different type. Match the sender to the gauge otherwise it might not work!
That's right . The Moss sender suits ETB intruments
I just love the Stylus but she keeps swallowing £££ !
Alfa Red 159 2.4 jtdm ti 260bhp 365lbft / BilsteinB12 + Adjustable Powerflex camber/castor bushes. Red STYLUS 2lt zetec 231bhp 185lbft Dunnell . RED 1972 Alfa 2lt GTAm replica 170bhp.
User avatar
Werner Van Loock
Stylus owner
Posts: 531
Joined: Tue Feb 28, 2006 3:37 pm
Are you a Stylus owner?: yes
Location: Antwerp, BE
Contact:

progress :shock:

Post by Werner Van Loock »

Started dismantling piece by piece.

Finally took the front hubs off, the one that wouldn't turn freely had a split pin between the wheelbearings :shock: :shock: :shock:

And there's grease in there for ten wheel bearings, it was fully packet resulting in everything being covered in grease while only the bearings should have grease.

I'm already happy that I'm taking it apart. Just hope I don't run into more surprises :?

Regarding fuel sender, I'll drill and punch 6 holes then. Fuel sender should be compatible.


Oh and handbrake installation working right now :D Thanks Matt
User avatar
se7ensport
Stylus owner
Posts: 349
Joined: Thu Aug 24, 2006 3:17 pm
Location: Bristol

Post by se7ensport »

with a part built you are strongly advised to take everything apart and double check, it's quite quick to do at this stage as opposed to being a sod of a job later.

ask me how I know :twisted:
User avatar
Bikenuts
Stylus owner
Posts: 131
Joined: Tue Mar 28, 2006 2:16 pm
Are you a Stylus owner?: yes
Location: Weardale England

Post by Bikenuts »

se7ensport wrote:with a part built you are strongly advised to take everything apart and double check, it's quite quick to do at this stage as opposed to being a sod of a job later.

ask me how I know :twisted:

What he said

Every thing the previous owner had done on mine had to come off as did some of the "factory" fitted parts - 12mm bolts in 1/2" bushes - not good.
User avatar
Werner Van Loock
Stylus owner
Posts: 531
Joined: Tue Feb 28, 2006 3:37 pm
Are you a Stylus owner?: yes
Location: Antwerp, BE
Contact:

Post by Werner Van Loock »

Small update, the O/S rocker arm didn't move either, completely seized. Had to use some serious power to get the axle/pin out making grooves in it and tearing the bearings apart.

After all was cleaned and bearings removed I measured the holes and they are oval meaning the bearings must got distorted putting em in and seizing on the axle/pin.

After some dremel work the new bearings slide in smoothly and the axle/pin goes in without force!
Mounted it to the car and now the rocker arm on its own just moves using my pinky :D
Will do the other side too, not that it is stuck but doesn't move the way this one moves.

BTW needle bearings needed are Timken B1212 (3/4x1x3/4)

Still waiting on new rubbers for all the ball joints though, so a little bit stuck :(

Oh, and I noticed I will have to weld some pieces on the steeringrack stays as mine don't have a reïnforment and apparently they tend to break then. (seen it on the SSR list)
Post Reply